I finally managed to get round to doing something constructive with the Arduino I bought a few months back. For a long time I'd wanted a foot controller I could use with Ableton Live. I also fancied having a go at using MainStage for live performances.
In my shed I had an old Vox Tonelab LE multi-effects pedal that I used to use for the Clarendon Jam night. After many nights of getting trodden on, kicked about and having pints spilled on it, it finally decided it had had enough and refused to power on any more.
This is the donor pedal.

The plan
The plan was pretty simple. Take the bits I wanted from the old pedal and wire them up the Arduino. Somehow along the way, some yet-to-be-determined magic would transform the signals from the Arduino into MIDI signals that I could then pass on to Live, MainStage or any other MIDI recipient I fancied.
All pretty simple apart from the minor details of hooking up the components to the Arduino and figuring out the necessary magic to turn the signals from the Arduino into MIDI signals.
Part 1 - destroying the old pedal
Since ripping stuff to bits is generally easier than putting stuff together, pilaging the existing pedal for useful components seemed like a suitably cavaliar place to start. In particular I was keen that the pedals felt like 'proper' guitar pedal footswitches and I liked the ones on the Tonelab so I wanted to make sure I could resuse those.
After taking the pedal to bits, it turned out that this was really what I was after. →

It consisted of a single PCB with 7 switches, some LEDs and a bunch of supporting components. Pressing down on one of the pedals would push on one of these switches.

I removed 4 of these switches and soldered them onto some small pieces of stripboard. I also attached a 220k pull-up resistor to each of the positive terminals and connecting wires to the ground and sensor terminals.
← The result looked something like this.
I ended up with 6 connecting wires. A common +ve that connected to the +5v on the Arduino, a common ground that connected to the ground on the Arduino and then a connection for each of the switches that connected to a digital input pin on the Arduino (for what it's worth I ended up using pins 2-5 for these).
Throughout the whole process I found it useful to have a test script running on the Arduino to be sure that I had everything soldered properly and that things were working as expected. A simple script to turn an LED on and off when a button was pressed was sufficient.
Part 2 - the magic
With everything hooked up, it was time to figure out what sort of magic was needed to convert these button presses into usable MIDI signals.
In my initial vision for this pedal, this was all handled by the Arduino and the signals sent to the PC would consist of fully formed MIDI signals.
There are some definite advantages to this, the main one being that the pedalboard is then entirely self sufficient and more akin to the kind of MIDI controller you would buy in a shop. However my C++ is not all that and whilst I am always interested in learning new skills and languages, after a bit of hunting on the net, it was clear that I was going to have to up my game in order to get this working.
Last year I was at the Scottish Ruby Conference and watched a presentation by Austin Vance about a gem he had created called dino which allowed programming an Arduino in Ruby rather C++. The way that this worked however was to upload a standard firmware to the Arduino. The dino gem would then handle communications between a ruby script on a host computer and the Arduino. The plus side of this was that, for a Ruby programmer at least, the programming side became much easier and all the usual Ruby tools and tricks became available. The big downside is that it then becomes necessary to have the Arduino connected to a host computer for the Ruby script to run on.
Initially I had been very much in favour of going the 'proper' route and doing all the coding in C++ in order to avoid the dependency of the host computer. However as I started to realise what was going to be required in order to do a decent job of sending out and handling these MIDI signals I started to think again about the dino gem. I also tried to focus on what was actually required in order to get the job done - ie the minimum viable project. It was pretty clear that with my skill set the C++ route was not going to be the simplest option and that in fact the practical benefits would be few - after all I would still need to be connected to my laptop in order to run Live or MainStage therefore so long as there were no performance issues, running an additional Ruby script on top was not much of an issue.
So with this in mind I then started looking at how I would send out the MIDI signals once I received a signal from the Arduino and stumbled across a great couple of gems. Firstly there was the UniMIDI gem that does a lot of the hard work around sending and receiving MIDI messages and if that wasn't enough, there is also a nice little DSL in form of the MicroMIDI gem that sits on top of it meaning you can write things like
# Play C2
note 'C2'
So that was the MIDI taken care of.
Now that I was all tooled up, I connected one of my switches to pin 7 of the Arduino, another to pin 9 and wrote a quick script to check that I could send a MIDI message in response to a switch being pressed. I also got the LED on the Arduino to light up and puts out a simple message in the process. The script looked like this
require 'bundler/setup'
require 'dino'
require 'micromidi'

@output = UniMIDI::Output.gets

board = Dino::Board.new(Dino::TxRx::Serial.new)
led = Dino::Components::Led.new(pin: 13, board: board)
button1 = Dino::Components::Button.new(pin: 7, board: board)
button2 = Dino::Components::Button.new(pin: 9, board: board)

MIDI.using(@output) do
  button1.up do
    note 'c'
    puts 'button 1 pressed'
    led.send :on
  end

  button1.down do
    off
    puts 'button 1 released'
    led.send :off
  end

  button2.up do
    note 'e'
    puts 'button 2 pressed'
    led.send :on
  end

  button2.down do
    off
    puts 'button 2 released'
    led.send :off
  end
end

sleep
Part 3 - MainStage
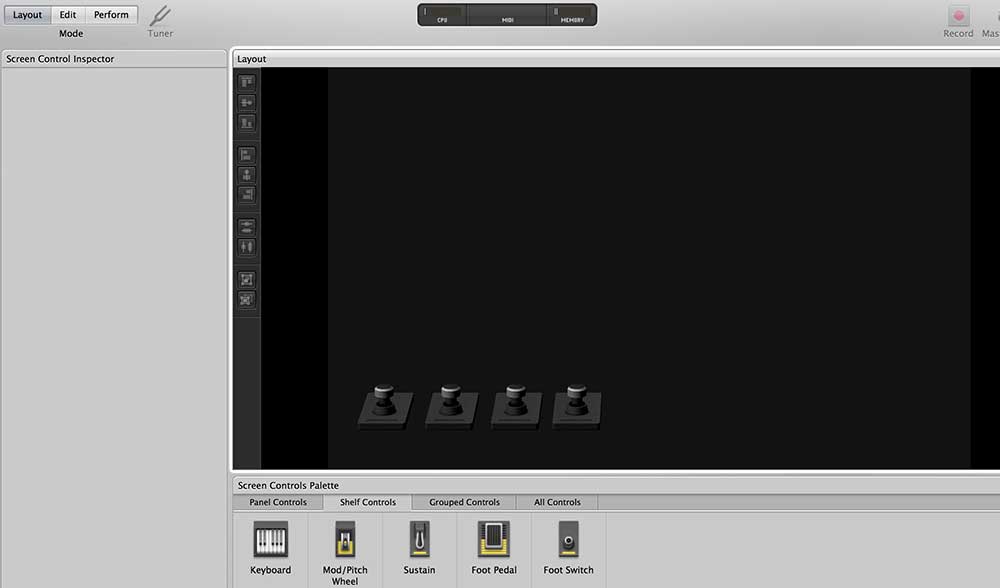
The next step was to hook this up to MainStage. I did this by creating a new 'concert' from a blank template. I then added 4 buttons in the layout view to match the physical board.

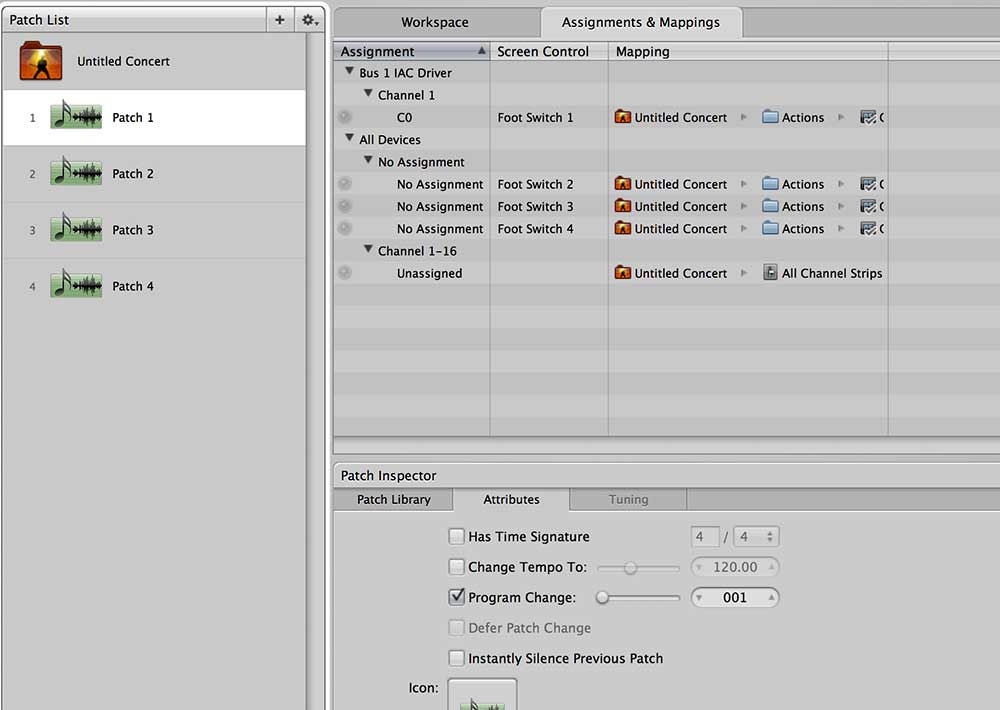
I then switched to the edit view and added 4 patches. I mapped each button to a patch and also assigned it to a MIDI signal.
I decided to use MIDI notes initially as they were the simplest signals to send with the MicroMIDI gem. It was also necessary to make sure that I was using the right MIDI channels so that the settings in MainStage matched those I was sending. I found a great little MIDI Monitor app for OSX that helped me get these setup correctly. Now I could change a patch in MainStage by pressing a button on the pedalboard.
Another issue then became apparent. I was turning the LEDs on and off based on the button presses. However if I decided to change the patch in MainStage directly without using the pedal board, the LED would not change to match.
To overcome this I set each patch to broadcast a program change message when it was selected. This meant that I could watch for this message in my Ruby script and turn the appropriate LEDs on or off accordingly.
I also removed the code to turn the LEDs on or off when buttons were pressed on the pedal. This worked out for the best as it led to a clearer chain of events:
Button pressed -> MIDI Message sent by board
MIDI Message received by PC -> Patch changed
Patch changed -> MIDI Message sent by PC
MIDI Message received by board -> LED state set
Part 4 - Spit and Polish
With the key functionality up and running I did some tidying of the Ruby code and ended up with a little application I could use to run a startup script that would configure the board in terms of which MIDI signals I wanted to send and how I wanted to handle the response. I also added in some extra functionality to support rotary pots and long button presses - effectively doubling the number of pedals. By using a boot script, I can have different sets of MIDI signals for different use cases such as a looper vs an effects board.
The code for this is up on on Github and the script I use for my MainStage setup looks like this
pot pin: 'A0',
change: ->(value) { set_volume(value) }
pedal pin: 2,
press: ->{ patch 1 },
long_press: ->{ patch 4 }
pedal pin: 3,
press: ->{ patch 2 },
long_press: ->{ patch 5 }
pedal pin: 4,
press: ->{ patch 3 },
long_press: ->{ patch 6 }
pedal pin: 5,
press: ->{ next_set },
long_press: ->{ previous_set }
led1 = led pin: 6
led2 = led pin: 11
led3 = led pin: 8
led4 = led pin: 9
altled1 = led pin: 10
altled2 = led pin: 7
altled3 = led pin: 12
altled4 = led pin: 13
MIDI.using(pedalboard.midi_input, pedalboard.midi_output) do
receive do |message|
if message.index == 22
begin
led1.light_if message.value == 1
led2.light_if message.value == 2
led3.light_if message.value == 3
altled1.light_if message.value == 4
altled2.light_if message.value == 5
altled3.light_if message.value == 6
rescue Exception => e
puts e.message
end
end
end
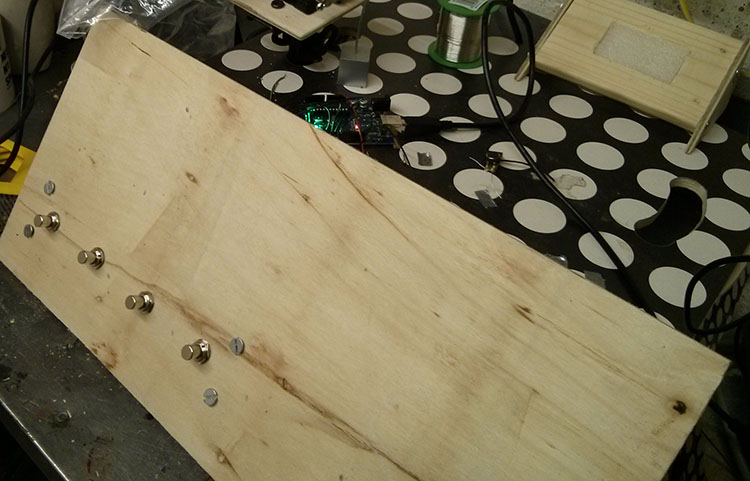
endAlso at this point, my 'pedalboard' was actually a fragile collection of stripboard, components and wires that wouldn't have lasted 2 seconds if I'd stamped on it. Fortunately I had a piece of ply hanging around my shed that I'd saved from a furniture delivery for just such an occasion. I combined this with the original Tonelab frame and foot pedals to create something I could stomp on without too much fear of the whole thing disintegrating.
And there we have it - a working MIDI foot controller using Ruby and an Arduino. To prove it here's a slightly awkard video of me using it to switch between MainStage patches!